 Here is the Summer collection of permaculture tips and tricks from the Southern Oregon Permaculture Institute, enjoy.
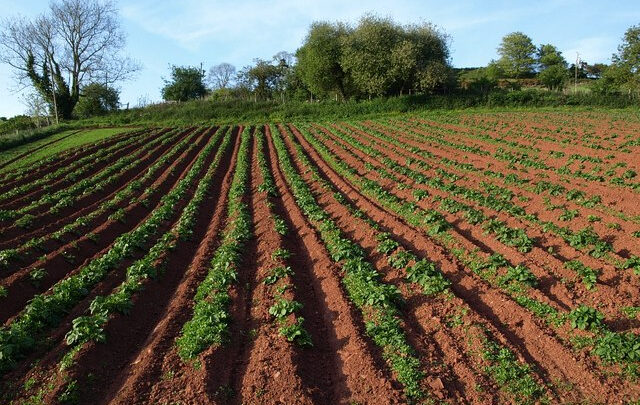
1. Permaculture blueberries. After two years of hand-weeding our two acres of blueberries we have let them go wild. The plants are five years old now and can compete with the former hay field grasses with the help of us discharging the mowing trimmings back into the blueberry rows as mulch. The blueberries started in fully tilled rows with 3” of fresh sawdust, wood chips will also do. We also added initially enough soil sulfur to bring the pH down from about 6.2 to 5.2. Prune in the winter to encourage new growth, remove disease and wondering branches. We salted the field with pecan trees. Blueberries are a medium term 15–20 year crop and will be pushed out when the pecans are in full swing, we have already designed in the succession. Several rows are also capped with Honeycrisp apples.
2. White is the new black shade cloth. We felt that black shade cloth actually heated or green houses in the summer and caused the plastic to breakdown faster. We now use white row cover material called Agribon. The AG-50 for heavy freeze protection is roughly equivalent to 60 percent black shade cloth and it keeps the greenhouses cooler with less material. Johnny’s Selected Seeds has a nice selection of wide rolls, search for “Agribon”.
3. We rest our fields by sowing a cover crop of beneficial plants such as crimson clover, vetch, peas, or rye. If we want a fast growing annual to smother weeds, we add mustard, oats or buckwheat with crimson clover. For a permanent living circulation paths, plant New Zealand white clover—it is a low growing, nitrogen fixing, drought tolerant perennial that likes to be mowed. We also use 1-2” wild thyme for foot paths. Prepare the soil bed thoroughly for perennial cover crops before sowing to avoid weed competition. Be patient and wait for weeds to emerge and re-spade or till. See Territorial Seed Company for broad-scale cover crops or Restoration Farm for wild thyme food forest mix in 2012.
4. Every output should be an input to another element in your permaculture system. Here we are tilling in rabbit and guinea pig composted manure into our Zone 1 kitchen garden mid-summer rotation. About the 4th of July, spring plants have been eaten or pulled and fall crops are going in. Do flag ideal plant types during the growing season to be saved for seed later. Leave them in and work around them until you can collect the seed.
5. Another example of an output becoming an input are weeds from the kitchen garden and bedding from the duck house onto the potato raised beds. As discussed in No. 10 of our Spring Permaculture Tips and Tricks we plant our potatoes in a combination of compost and mulch in raised beds with hardware cloth bottoms. Duck house bedding is part of a seven fold use: yard trimmings to duck house bedding, duck house to potato raised beds, to Fall compost pile, to Spring Zone 1 kitchen garden, to the dinner table, to the compost pile or future composting toilet.
6. In this photo onions are going to seed in an un-plowed fallow section in Restoration Farm’s Zone 3 garden. You would think seed saving season began in September, but with bi-annuals like brassicas and alliums it starts in late June and early July. Think seed saving Summer through Fall.
7. Queen Anne’s lace or wild carrot is easily identified in your carrot patch by late June or early July. If your carrot seed has crossed with Queen Anne’s lace you will get fuzzy larger stemmed plants that look similar to carrots but have a white root. The wild carrot is the larger plant on the left and the real carrot is the smaller smoother stem plant to the lower right.
8. Save difficult to design areas for later. This winter we expanded the Zone 1 garden to a rotational “vegetable family” block system. However, we have a challenging spot right off the stairs from the kitchen seating area into Zone 1 under a large black walnut tree. We are dealing with the inhibiting juglone from the black walnut plus the tree roots. We started by trimming off the side of the tree that overhung the Zone 1 garden. Now we have tarped the area right off the steps to establish a no-till garden area. On the back side (tarp behind tree) of the walnut we will plant black raspberry and maybe a persimmon both of which are Juglone tolerate. On the kitchen garden side (tarp in front of steps) we will plant sweet cicely which is also juglone tolerant and rapidly growing plucking vegetables in a renewed compost–mulch–soil bedding.
9. For a broad-scale food forest cover crop plant French sorrel and shasta daisy. French sorrel is not only edible but also is a dynamic accumulator of K, P , Ca, Cu, Fe, Mg. Sorrel roots tunnel down four to six feet and mine minerals to be left on the surface each winter as the leaf litter dies back. Both French sorrel and shasta daisy can compete against a pre-existing hay crop if seed drilled in. The photo on the left shows the original grass coverage and the right photo shows how French sorrel competing with tall grass. You can see a band of Shasta daisy on the right edge of the second photo.
10. Eat your broccoli and and save the seed too. The trick is to harvest to eat the first king umbel that emerges and then save seed from the side flowers that emerge later. Two cuts from harvested broccoli are shown in the center of this photo and new broccoli shoots are starting to emerge to bear flowers for seed.
11. Weeds can be food too. In this photo is a delicious large red leaf mustard common to us here in Southern Oregon volunteered into our Zone 1 kitchen garden. I know two home owners that also planned to replace a beautiful cover of perennial shade loving miner’s lettuce with lawn, oh no! A wonderful urban wildcraft educational website is Becky Lerner’s www.firstways.com. She offers informative descriptions and beautiful photography of useful weeds in Portland, Oregon.
12. Save time with a timer. I don’t know why we did not do this earlier but we finally replaced our manual egg-timers with a new super easy to use frequency and duration timer from Orbit. We have been using daily timers in our commercial greenhouse for years why not in the Zone 1 veggie and Zone 2 gardens. Remember to water in the cool evenings and that infrequent deep watering draws plant roots deeper than more frequent short duration waterings.
13. Put a ball valve underneath your sprinklers to allow continued operation while you unclog a sprinkler. This saves a lot of time walking back and forth to turn on and off the whole system. I would recommend metal ball valves instead of this plastic one because the plastic valves stick and the handles break off. If you have to use a plastic valve, put it on the North or shady side to reduce aging from the sun. If you have a number of sprinkler heads and a limited budget put the valves just on the end sprinklers because they are the most likely to clog with debris.
14. If you really want to do it up right, integrate a garden hose bib with your sprinkler head riser. My friends Chip and Ish at the Mountain Homestead came up with this solution: riser, hose bib, spacing nipple, ball valve, sprinkler. In this photo, you would screw in a sprinkler where the 6” plastic nipple is at the top.
15. The five rules of compost piles. 1. A compost pile should be in contact with the ground so worms and other beneficial bugs can work it. 2. turn your compost pile once a week, see below for piles with manure. 3. Cover your pile to prevent rains from leaching out nutrients and keeping the pile moist. 4. Separate your piles by age: new material, working and finished compost piles. 5. Separate your woody–brushy compost piles from your kitchen scraps faster degrading weedy piles.
If you have manure in your compost pile the USDA Organic Rule requires that composting plant and animal materials be produced through a process that establishes an initial C:N ratio of between 25:1 and 40:1. And that a temperature of between 131 ˚F and 170 ˚F be maintained for 15 days using a windrow composting system, during which the materials must be turned five times. Or maintain a temperature of between 131 ˚F and 170 ˚F for three days using an in-vessel or static aerated pile system; it then must be cured for 45 days.
16. A ground covers should be beautiful, functional, beneficial and edible. Here is the ground cover in the beneficial nectary–flower garden that separates our Zone 1 annual garden from the Zone 2 perennial garden. In this photo there are a 1,000 young perennial flowers in a bed of wild thyme sprinkled with lettuce and radish volunteers. The thyme is aromatic when you tread on it—it smells good too.
17. The key to a long-lasting garden gate is light–weight and artwork. Our gates are made from simple 2×2”s with corner brackets and rubber coated garden fence or chicken wire. Our ducks and chickens free-range around Restoration Farm but are fenced out of the veggie patches. We fence the foul out with 48” tall PoultryNet from www.premier1supplies.com. This is a light flexible system that is much less expensive and faster to put up than a wood fence.
18. Label plants you want to save seed from or remember the source. This is a given in for Spring starts or direct seeding. But it is important to remember to refresh the labels mid-summer as they fade from the sun and irrigation. Sit in the garden for a few relaxing minutes and update faded labels. We use a thin Sharpie and Pylon 6” Plant Labels from www.btgrowersupply.stores.yahoo.net. Note the common name, variety, initials of the seed source and sowing date. Don’t rely on seed envelopes on a stick.
19. Last but not least is our kitchen garden free-range rabbit “Bun Bun”. Petter rabbit in the veggie patch, how can that be! Well our rabbit spends the day eating clover and other smaller weeds and then heads to the rabbit house to be safe and sound at night. There is so much food in the garden we cannot eat it all, so we share the surplus with Bun Bun. There is nothing more entertaining to the kids than seeing the rabbit scurry down the rows while we are eating our meal from the garden.
Good Growing,
~ Chuck Burr