Last year in foothills North Carolina, we had a hundred-year flood in June. Then we went three months without any rain at all. Some things produced well in spite of drought, but tomatoes really suffered and I hardly got any pumpkins. I was not able to keep things adequately watered by hand even before my catchment tank ran dry.
I know that the carbon footprint of tap water is pretty small compared to, say, tropical vacations. But I still have a philosophical problem with paying to have water cleaned so thoroughly that it’s drinkable, and then pumped for miles and miles, only to pour it on the ground. I like the idea of living within the rain budget of my area, which isn’t too hard because we usually get too much. I like the idea of having irrigation water even if I lost access to my local water utility for some reason (power outage, income outage, anything).
Most of all, I like the idea of my garden looking all big and lush like my mom’s. She waters constantly.
So, this spring I added a second catchment tank to our little house, and one to the new pole barn up by the orchard. Big irrigation tanks cost hundreds or thousands of dollars, but I can get a used IBC tank for about $45. I’ve now set up five of these tanks, and I feel it’s a relatively easy and cost-effective option for small-scale irrigation.

This is my Dad’s very nice setup, which I helped him install as a fun Mother’s Day project. Don’t worry, this photo was taken before completion, and the final installation does not include painter’s tape.
IBCs have a lot of advantages: readily available, light enough for two people to handle easily, come in a metal cage for support, have a sloped drain and hold at least 275 gallons. Unfortunately they are polyethylene which is so inert that nothing sticks to it, making them a little bit difficult to plumb. Also, they have to be covered because they’re vulnerable to decay over time in sunlight.
I want the covering to be fairly impenetrable to light, not just to preserve the tank but also to keep algae from growing inside. That would eventually muck up the outflow. For the tank I installed three years ago I tried to buy a heavy-duty UV-resistant tarp, but I ran into trouble finding one large enough from a reputable supplier. I got the Amazon run-around, if you know what I mean.
I ended up with a piece of black painter’s plastic that was lying in the barn. I taped it on with gorilla tape and tried to cover most of the holes. It’s not pretty and it’s not perfect. For later tanks, I have built a wooden frame around the tank and used repurposed aluminum roofing to cover it.
 My original tank, still sporting a MacGyver-style cover. This tank was originally set lower. I raised it to get enough fall to gravity-irrigate the garden.
This isn’t the most attractive solution either, but it’s much more durable and light-proof, and it can be painted a nice color if I ever have time to go around just making things pretty. My friend has a tank she’s planning on covering with a tarp and then some spare vinyl siding. There are lots of options.
In addition to covering, tanks need a fitting to size down the outflow to something useful, like a garden hose spigot. Tanks come with a valve but it takes some force to turn most of them, and I’m happier leaving it open and using the spigot to regulate flow. On some tanks the outflow has external threads that will screw right onto a 2” female PVC coupling, and then all that’s required is a coupling to fit a ¾” spigot.
My first three tanks were that type, and they were a dream. Then I got two that did not fit any extant PVC coupling, and they were a headache. One was just a smidge small for a 2” coupling, but I was able to make the connection well enough with plumber’s putty since the pressure isn’t high. It’s been sitting for months without leaking, and I’m pleased.
The other wasn’t going to fit anything made by man or nature. I took the fairly robust plastic cap that came with the tank to cover the outflow (most used tanks don’t have a cap still with them, but luckily this one did), drilled a hole in it with a spade bit just a little smaller than my ¾” threaded male spigot, and forced the thing in there, turning with wrenches. Shockingly, this has proved a durable and functional solution.
Next time I buy a tank, I’ll take a 2” threaded female PVC coupling with me and check that it’ll be the dreamy kind, not the headachy kind.
Tanks also need an overflow to direct water away from the foundation of whatever building you’re using for collection. I’ve used 1 ½” PVC, but 2” is definitely better around here, where we get serious storms. You may have noticed that my style is a little slap-dash, so you won’t be surprised to hear that I’m quite happy just drilling a hole in the side of the tank, pushing the PVC in up to the elbow (an inch or two of pipe inside the tank is plenty), and sealing it up with plumber’s putty. I tie the pipe to the frame of the tank to keep it from shifting and breaking the putty seal.
Nothing but plumber’s putty sticks to polyethylene over the long term in my experience. Not silicone, not the good expensive Lexel caulk, not even epoxy. If you know of something that does, please tell me!
My father, on the other hand, is a civil engineer, which is the polar opposite of slap-dash. When he asked me to help him set up a tank, I knew I was about to see some very clever fitting combinations. Sure enough, for the overflow he set up a pair of couplings, one on the outside and one on the inside, with a foam rubber washer between them. Then somebody had to lay on top of the tank and stick their arm all the way over to the wall to screw them together. It’s a great solution, though, and very water-tight.
My tanks have just a regular gutter downspout feeding into the opening at the top, with a fine-mesh filter tied around the lip to keep out leaves and other detritus. I’ve used both fiberglass and aluminum window screen mesh, and both work fine although I suspect the aluminum will probably last longer. Dad’s tank has a very slick two-part cap with a similar screen and a rubber gasket made out of the inner tube from a blown bike tire. Engineers.
Expenditure (varies slightly depending on what I had to do to the outflow and how far I needed to plumb the overflow to get it away from the building):
Tank: $45
PVC: $9-13
Spigot: $6-8, depending on what kind you want.
Screen: $10 for a fiberglass roll that would do more tanks than I’ll ever need. I used the rest to make racks for my solar dehydrator.
Total: $70-76
That’s all just to get the tank set up. Then I needed to get the water to the plants.
I used to fill jugs and water by hand until the garden got too large, and I still do it that way when I’m applying fertilizer or watering in seeds. Alternatively, I often hook up a hose and just spot-water whatever needs it. That works fine, although my tanks are not far enough uphill from the garden to provide the sort of pressure that would operate a water wand, like you might be used to using in your garden or greenhouse.

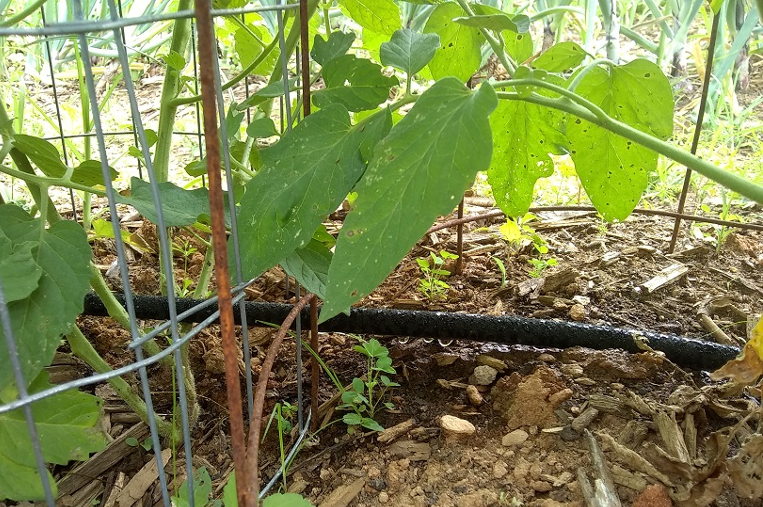
Gravity-fed soaker hose distributing catchment water to happy tomatoes, while I happily do something other than watering.
I also wanted the capability to just turn on some water and walk away, so I set up a soaker-hose system. I had to chase down one designed for gravity-feed (a.k.a rain barrel), because most of the regular soaker hoses sold at Lowes and similar are meant to operate with a pressure of 35-100psi, like you would get out of your existing domestic water system. They won’t let out any water from unpressurized tanks (and it’s important never to hook a gravity soaker hose up to pressurized water, because they blow out from the pressure).
Since this was just a test, it doesn’t feed the whole garden, only a couple of rows. I bought 100 feet of hose and cut it to size, but my rows are about 35 feet long, so one of the legs is a little short.

I cannibalized a garden hose to hook the soaker hose sections to the catchment tank.
This probably isn’t the cheapest way to do it, using garden hose lengths and connectors between the pieces of soaker hose, but it does let me bend it around to lay two hoses on one bed if I want to, and it lets me turn off each individual hose separately. I’m usually willing to pay a little more for increased flexibility. I ordered end caps but forgot to get extra connectors to screw them onto, so I used the patented lazy-farmer drip tape method: fold up the end and tie it. This works fine.

Close up of hose assembly in progress. You could get yourself a female to female Y and save a little money on hose ends, but they didn’t have one at my local plumbing supply.
Expenditure:
100’ of gravity soaker hose, 3 ¾” male connectors (fits a female garden hose end) and 3 useless caps: $44
Garden hose parts (2 Ys and 7 female ends): $31
Part of a hose I had lying around: $0
Total: $75
Fun fact: those useless caps turned out to not be so useless after all. They solved a little problem I had a couple weeks ago.
See, I winterized the outside domestic-water spigot last fall like I always do, cutting off the water, letting out the pressure and leaving the valve open. But someone (not saying who) came along behind me and closed the valve, and maybe someone (not necessarily the same someone) turned the water back on at some point.
This line also feeds the solar shower, and when I went to set up the solar shower in its new location this spring, I discovered the valve in the outside spigot was busted, like they get when ice forms in them. I was sweaty and needed a shower, but the shower couldn’t be filled without spraying water all over the patio.
Big problem. I was not doing extra runs to the local plumbing supply, what with the virus and all. But, those little useless caps fit the busted spigot, so I could close it off and conveniently continue to fill my shower for a couple of weeks until I could fix the spigot. Neat!
Do you have water catchment? How does it work for you?