At our house we have a goal to produce 80% of our fruit, veggies, meat and dairy within five years of moving onto our land. We only eat a little meat and dairy, but we eat tons of veggies, so we grow a great big garden. Gardening is full of setbacks such as this summer’s drought, and successes such as this fall’s greens, but it’s always interesting. And it’s a powerful tool in the face of global environmental problems and personal health issues.
A vegetable from your garden measures its travel in feet, not miles. According to How Bad Are Bananas? The Carbon Footprint of Everything by Mike Berners-Lee, a local apple in season emits only 10 grams of carbon dioxide equivalent, while an apple that is “shipped, stored and inefficiently produced” emits fifteen times that. Asparagus packaged and air-freighted emits 28 times as much pollution as a local bunch. Plant foods are kinder to the planet than animal foods, and whole foods are kinder than processed foods, but garden foods are best of all.

Eggplant did well in my garden this summer, growing in sheet mulch and fertilized entirely with household waste.
A vegetable from your garden is grown safely and nutritiously with no E. coli contamination and no chemicals you don’t know about. A vegetable from your garden is fresh, giving you the biggest possible dose of vitamins and the most interesting variety through the seasons. Even people with tiny yards or just a balcony can grow something, thereby gaining knowledge and skills that will be valuable as we continue trying to live on this damaged planet.
In contrast, conventionally-grown produce requires nitrogen pulled from the air using natural gas, the production and over-application of which produces a whole host of environmental problems. It requires phosphate mined from the ground, which is being depleted. Even organic produce often relies on non-renewable Chilean nitrate or other unsustainable practices. Organic fertilizer must be processed, bagged and shipped to your local hardware store or garden center, and each of these actions has an environmental impact.
Luckily, there is an alternative. Our garden has given us many wonderful harvests, and I have never bought fertilizer for it. This free fertilizer scheme has two main components: sheet mulch and utilizing waste. Sheet mulch is the process of spreading organic matter thickly over the soil. You might have heard this called “lasagna gardening,” because the material is layered like pasta and sauce.

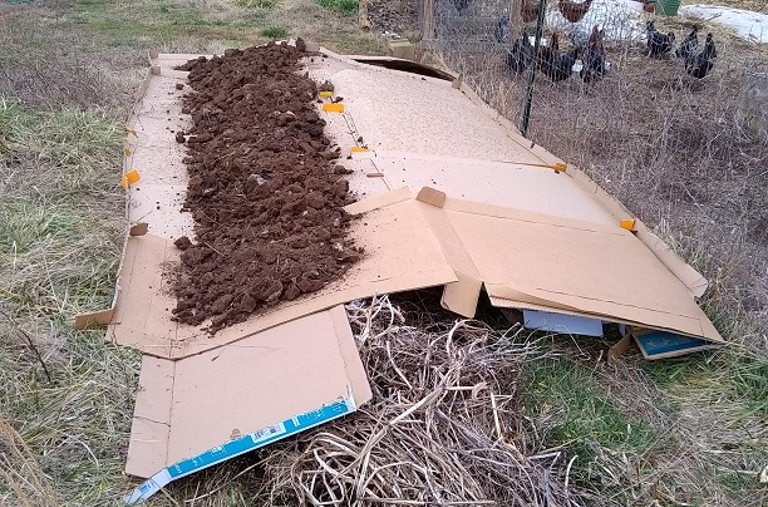
I made a terrible mistake planting aggressive raspberries inside my garden fence, so this spring they are getting a new bed outside the fence. I drug all my crop waste out of the garden, forming a row to correct the slope. Then I laid double corrugated cardboard, with ancient manure on top.
The first layer acts to suppress weeds. We’ve found that at least two sheets of overlapping corrugated cardboard works best. Our first sheet mulch cardboard was the boxes that had moved our worldly possessions from house to house to house, but we now accept cardboard from neighbors, friends and my husband’s University. In a pinch, I’ve pulled some out of the bins at the local dump. We try to store it mostly dry, and to get most of the tape off before laying it out. This is easier if the cardboard is a bit damp, but if it has been repeatedly soaked it doesn’t suppress weeds as well.
Next we weight that cardboard down with anything basically weed-free that used to be a plant, to a depth of at least three inches and ideally more like eight. This can be sawdust, wood chips, straw, leaves or compost. When we bought our land, the previous owners had left about 500 cubic feet of ancient cow manure in the barn. Some parts of that mess have been far too hot (too much nitrogen) for tender plant roots, so we’ve been careful to let it get wet and begin to become soil before planting into it.

Partially-composted chicken litter out of the barn forms the next layer of this bed, holding down the cardboard.
Over the old manure we use fresher barn litter from our animals. We practice a deep-litter arrangement, filling each stall with eight inches or more of planer shavings. This is a waste product from our local lumber mill, somewhere between sawdust and wood chips in texture. That bedding sits in the stalls for six months to a year soaking up animal waste, being turned by the chickens and beginning to compost. Then we haul it over to the garden where it sits in the weather for some months before planting. Soil organisms work on it, breaking it down and out-competing pathogens.
Another material we’ve used for the top layer is wood chips that come free from our local landfill. This is coarser than planer shavings, with some sticks but also quite a lot of dark, well-composted fluff. It’s heavier and harder to shovel, but my friendly local sanitation employees fill my truck for me with their giant loader, so I only have to shovel it once.
The disadvantage of a sheet mulch system is that it’s a lot more work to build the garden in the first place. Hauling all that stuff isn’t my favorite job, especially the old manure which is very heavy.

The bed just gets longer and longer! Because we really love raspberries. I used up my entire stock of cardboard, and then all the paper feed sacks from the last year. This end will get a layer of litter out of the goose stall, and then probably a load of mulch from the dump spread over the whole thing.
On the other hand, there are a lot of big advantages. The mulch greatly reduces the number of weeds in the garden, and it’s easy to pull those that do take root. Over time the mulch breaks down and mixes with the under-layers through the action of worms and other soil organisms, turning into springy organic soil that holds water and nutrients. Those decaying organic materials provide nutrients that are lacking in our conventionally-grown foods due to soil depletion and possibly also to climate change.
In order to break down mulch soil microorganisms require nitrogen, but so do growing veggies. The last thing we want is for our plants to be competing with soil microorganisms for nitrogen, because the bacteria win while the plants languish. We supplement the fertility of our mulch garden with household wastes: ashes from the wood stove for potassium and micronutrients, and fresh diluted urine for nitrogen and phosphorous.
Positively-charged nutrients like calcium are more available to plants when the pH is closer to neutral. A pH of about 6.5 is usually the best compromise for the widest range of garden veggies, but many soils start out around 5.5. In addition to adding minerals, wood ash brings up the pH of garden soil. I just sprinkle ash lightly over the mulch, and I haven’t done any harm yet, but I’m always cognizant that if I accidentally apply too much wood ash and bring my pH closer to 8 the plants will really suffer.
In an effort to close nutrient loops on our homestead, we use all the bones of the small number of livestock we eat to make nutrient-dense bone broth. This balances our carbohydrate intake and keeps our nutrition good, while allowing us to eat less meat (more about diet here). After I carefully strip the bones of any soft bits to feed to the dog and cats, the bones themselves go into the wood stove and then become part of the garden ash, adding calcium, phosphorus and other minerals.
We have a urine-separating compost toilet. The solids go into a bucket to compost safely, while the liquids (urine and a small amount of flush water) can either be captured in a container or routed to the septic system (my county insisted I install it even though our house produces no “black water,” or water that is contaminated with feces). The drawbacks and advantages of our compost toilet system really demand their own entire upcoming post. For now, it’s enough to say that I dilute our captured urine by about eight times and apply it to the garden with watering cans.
This has to be done when the urine is fresh and still relatively sterile, or when the urine has been sealed and allowed to age about 30 days. During the aging process the pH of the urine changes from quite acid to highly basic. Either way is safe, but I use the fresh method because it’s less complicated (I don’t apply urine to things I’m about to harvest). Applying fresh urine isn’t a smell-free task, but then, no organic nitrogen sources are odorless. In my opinion, fish meal smells worse.
It’s easy to accidentally over-apply nitrogen, which can make your plants more susceptible to insect attack. Too much nitrogen can also cause lots of big fluffy leaves but smaller, sadder roots, flowers or fruits, which is fine if you’re growing lettuce but not as good if you want tomatoes and carrots. To avoid these problems, keep track of when you’ve applied and observe your plants closely for pests.
You can still utilize urine as a fertilizer even if you don’t have a urine-separating toilet. Setting up a catch jar for men and boys is easy enough, but even girls can learn to pee into a jar. Your guests need not know; jars should be washed every day anyway, and can just be put away when there is company. I’ve also seen excellent results with utilizing a big container of charcoal rather than the dilution method. In one experiment the men of the house contributed their urine to the charcoal bin, and then the charcoal was mixed into the garden soil. Charcoal is an excellent soil conditioner because of its fantastic nutrient-holding properties, but it’s best to put it into the garden already “charged up” with nutrients.
When embarking on a local, free fertilizer scheme it’s useful to gain a holistic idea of soil fertility, more than you can get from a blog post. Eliot Coleman’s Four-Season Harvest has a fairly complete compost chapter that covers his efforts to feed the whole plant with whole nutrients. A successful organic gardener for decades, Coleman has seen how pests and diseases indicate nutritional problems in the plants. He addresses them by fixing the plants’ diet, not by applying pesticides. We’re much less experienced around here, but we’re aiming for the same thing: building soil that makes healthy plants, in order to make healthy people.
The advantages of fertilizing using wastes go beyond healthy plants, and beyond being gentle on the planet. With this free fertilizer scheme I can still garden successfully if I don’t have extra cash to spend on fertilizer. I can still garden if my local hardware store goes out of business and I lose easy access to purchased inputs. I can still garden if something goes really wrong with the world, supply chains fail and it’s no longer possible to buy fertilizer. Many cultures have farmed their soil for hundreds or thousands of years, watching it gain fertility over time by returning all wastes to the Earth. By fertilizing for free we participate in that tradition.
Of course, there are many schemes other than ours. Do you garden? How do you fertilize? Tell us in the comments.