I admit it. It was me who brought the crazy house-building scheme into our marriage. But he encouraged me! If he hadn’t, I would have given up somewhere along the way. But I didn’t, and we built a house using light straw clay. How on Earth did that happen?

A light straw clay wall with lime plaster. Reclaimed wood ceiling, LED light fixture made out of a peanut butter jar and reclaimed wood, refurbished French door, and Sri Lankan warrior.
I’ve been focused on food and shelter for as long as I can remember. I think it must have been all those fishing trips in the rain (and sometimes the snow) that formed my childhood. We lived in Alaska and my parents had what is known there as “fish fever,” a mental disturbance which leads one to stand on a soggy riverbank at five in the morning every Saturday of the summer, trying to hook a salmon while their toddler throws rocks at them. It was a glorious way to grow up! But not always very comfortable. Of course I became obsessed with the many advantages of roofs over leaky blue tarps.
When I lived in Palmer, Alaska as a young adult, one of my four jobs was assisting my former boyfriend, a handyman. He showed me how to remodel a commercial kitchen, side a barn and build a sauna, which is very much like a small house. It was fascinating but also concerning. The high-tech materials had to be shipped thousands of miles, and they sometimes cost so much we couldn’t be paid much for our labor, if the customer was to be able to afford the project. That didn’t seem right.
Then at Cob Cottage Company in Oregon I trained in cob, an ancient technique using clay, sand and straw, with stone or recycled concrete for the foundation. We built adorable rounded houses that seemed right out of a fairy tale. Now that was more like it: materials that were free or nearly free, available just about everywhere, non-toxic, cozy and beautiful. All that’s needed is the hands to put them together and many, many hours to get it done.
Hands-on training is essential for acquiring building skills, but books are helpful too, especially in the planning stage. If you’re interested in cob or compact floor plans, one great book is Ianto Evan’s Hand-Sculpted House.
If you’re more interested in cord wood, straw bale or in-depth discussions about what it’s really like to build and how these materials impact the planet, Building Green is unusually comprehensive with lots of good pictures. And if you want detailed discourse on how elements in a building fit together and interact with the wider society, I found A Pattern Language to be a fascinating read. Beware, it’s very dense.
When I met my husband the Data Fiend (DF), we started socking money away for a round-the-world trip, but instead we had a baby and then another. I suspect the only people who enjoy traveling with little kids are people whose little kids sometimes occasionally sleep for a while. Ours did not, so everyone was very tired and cranky for years, and it seemed prudent to root. DF felt that the usual options such as a mortgage and a picket fence were… inadequate. If ‘inadequate’ were a bad swear word. He really wasn’t into them, which is why he encouraged me in my craziness.
Why would two very tired people decide to build a house? We had good reasons. We wanted to pay off our debt in under ten years rather than 30. We wanted a design that would keep the house livable if the power went off, and I wanted far less house to clean. We knew that even though it’s much less environmentally damaging to renovate rather than build new, renovations are very complex and always more expensive than estimated. Anyway, there wasn’t a structure on our beloved land that could be rescued. If we wanted to live here we would have to build, and since building is hugely impactful to the planet, we needed to build small and think carefully about materials.
We broke ground on the day our littlest non-sleeper turned one, and we moved in when she was just shy of two and a half. It was exhausting, exhilarating, headache-inducing. It was the best and by far the biggest project of my life so far, and I would never, ever do it again.

Here is the whole straw clay process in one image. Friends helping for the day, freshly-made mix on the tarp, forms being packed from the ladder, filled walls with the forms removed below that, and children gleefully getting muddy (sorry I mean “helping”) in the background.
I cannot express the sheer volume of decisions that must be made when you build a house yourself. Not just where the bedroom goes, but also what the bedroom is made out of and how you will put those materials together. How will you get it past the dour souls at the building department, and how will you fix your mistakes when you screw something up? Because you will screw up. There’s no avoiding it.
Most important is deciding how you will explain what you are trying to do to your poor assistant who is holding the other end of the 2×12, looking ever more perplexed. English is a completely inadequate means of communication between highly-visual people and less-visual people about building. There just aren’t enough of the right adjectives. I don’t mean to discourage future owner-builders, but you should know before you start that communication may be the hardest part.
One of the million decisions we made was to skip the usual wall materials. Walls work as a system, where one choice dictates other choices. Metal siding works fine with fiberglass insulation, but the condensation causes natural fibers like cotton to rot. Cob is durable under moisture-wicking lime plaster, but fails spectacularly under low-permeability Portland stucco. You’ve got to pick materials that play well together, and insulate enemies from each other. I liked working with cob, but it was far too slow for our project. The kids would be teenagers before we finished.
Plus, the building department was very tolerant and helpful, but they were only going to take so much hippie crap from me. No way was I getting approval for structural mud, never mind that there are hundred-year-old, six-story buildings in Yemen made out of it. The building department doesn’t give a hoot about Yemen. Since they required wood framing anyway, we figured we might as well fill the spaces with something lighter than wet mud. I had seen a neat demonstration of an old German technique called light straw clay. We chose that and covered it inside and out with lime plaster.
First we secured framing on top of the concrete stem wall on the concrete footer (more about concrete in another post). This was unusual framing, because the wall needed to be 12 inches thick to satisfy the building code’s requirements for R-value (a measure of the insulating ability of a material). The sill plates (board on the bottom of a framed wall) are 2x12s, while the verticals are a double set of 2x4s. The top plates (board on the top of a framed wall) are 2x4s. This is a more materials-intensive and therefore more expensive and more impactful exterior wall than is typically built. Someday I’m going to do a carbon footprint of the house and prove whether it was worth it.
To meet fire code, I had to lay a strip of ¾” plywood on top of the top plates. This is a silly thing to do when using light straw clay. Fire blocking is necessary in framed walls because most insulation is pretty much air, so the space between the siding and the drywall will act as a chimney drawing a fire upward. Light straw clay has insulating air in it, but it’s a very stiff and solid structure with non-contiguous holes and lots of nonflammable rock (aka clay). I couldn’t put my fist through a 3-inch-thick wall of light straw clay if I wanted to. It just doesn’t chimney in the same way. But that is not the last time I shrugged and did as the building department asked, even when it was a waste of time and materials.
Once the framing was up, I bought 30 bales of local straw costing $150. Not hay! Truly! We’re scientists so we just had to test it, and hay really does heat up and compost before it can dry. When we dug into the hill to sink the foundation four feet below the insulating earth, we saved out a nice pile of fairly pure red clay. We shoveled that clay into buckets and soaked it with water to make a slurry, mixing it with a paint paddle on a drill. Then we broke each bale in half onto blue tarps, added just enough clay slurry and messed it all around until each individual piece of straw was coated.

On top you see a packed plywood form, ready to be removed. You have to jam the straw down in there with a scrap of 2×4 or some other implement. On bottom, a mix all ready to pack. Slurry recipe was 1/3 to 1/2 of a bucket of clay (no need to screen, small stones are fine, no dead animals please). That should be covered with water to about the 3/4 line, and thoroughly mixed.
How much is enough slurry and enough messing? It took us a little while to figure it out. Too little slurry, and the straw won’t pack or stick together. It wants to pop apart like a bale when the string is cut. Too much and you just have a soggy mess that takes even longer to dry, and a waste of time prepping more clay. DF is a lab guy and really wanted a protocol. In the end he got one, but a qualitatively-based one. The wet muddy straw mixture is perfect when it looks like Carolina chopped barbecue.
After mixing, it’s time to pack that “barbecue” into the walls. We used temporary plywood forms screwed to the framing. Don’t worry, I would never cut up new plywood to make forms. These were scraps leftover from the roof sheathing, and they went on to become other useful things in their next life, after washing the mud off. Forms are necessary because straw clay really isn’t at all like clay. It has plans of its own. It resists. It must be pounded and shoved into place, and does not tolerate sculpting. But once it’s there, it’s there.
The plywood should be pulled off immediately so the mixture can start to dry. Even in hot sunny weather it takes weeks for a 12-inch wall to dry. The seed in the wheat straw sprouts, and the young roots dig into the wall seeking moisture as the outer surfaces dry. The roots tie the wall together even more, and the leaves pump water out as they photosynthesize. When the grass dies, the wall is dry in the middle.
Straw clay makes an excellent base for natural plasters, because it is quite stiff but full of holes for the plaster to ‘key’ or squish into, and hold onto when it hardens. We used seven 50-lb bags of hydraulic lime along with various amounts of leftover masonry sand, salvaged volleyball sand, red clay for color and workability, and water. Troweling on plaster is almost exactly like frosting the world’s biggest and most vertical cake. Funny how natural building lends itself to food metaphors.

On the left, the littlest non-sleeper wets the wall so the plaster won’t dry too fast and crack. On the right, the bigger non-sleeper helps dad apply wet plaster. I don’t want to give you the wrong impression of building with children. This was probably the nicest 10 minutes in 17 months of building. Most of the time they cry, throw things at you, and pour muddy water over each other’s heads. Then again, they’d be doing the exact same thing if they weren’t at a building site.
This was the point in the build when I most fervently wished we’d made the house even smaller than its 725 square feet, because I was so tired of plaster long before we were done. This was also where one of our all-time biggest marital conflicts arose. DF and I agree in almost every tiny point on politics, finances and what to watch on TV. We are practically the same psyche in every way that matters, but there isn’t a plaster mix that makes us both happy. He just likes his too wet. Sigh.
We used several different recipes, and some were better than others. In general, the more lime the harder the eventual plaster, up to a point where the lime joints between the sand grains get too large and crack. Our walls that got two good thick layers of 2:1 masonry sand to lime are performing the best over time, but that’s a fairly expensive mix. In all we spent $700 on plaster materials, and I wish we’d spent another $500 to up the lime content. This is because of the main drawback of plaster: it is as variable as the person who makes and applies it.
In some places our plaster is like drywall but with a solid backing, while in others it got mixed too soft or applied too thin, and my daughter has put dents in it with her skull or her remote control police car. I should have worked up all the different possible mixes on the first day, slathered them on in two good thick coats, let them dry completely and then punched them as hard as I could. That would have yielded the correct data to get the mix perfect everywhere, instead of fiddling as we went and scratching our heads and messing up. But I was too hasty, too rushed. It wasn’t the last time.

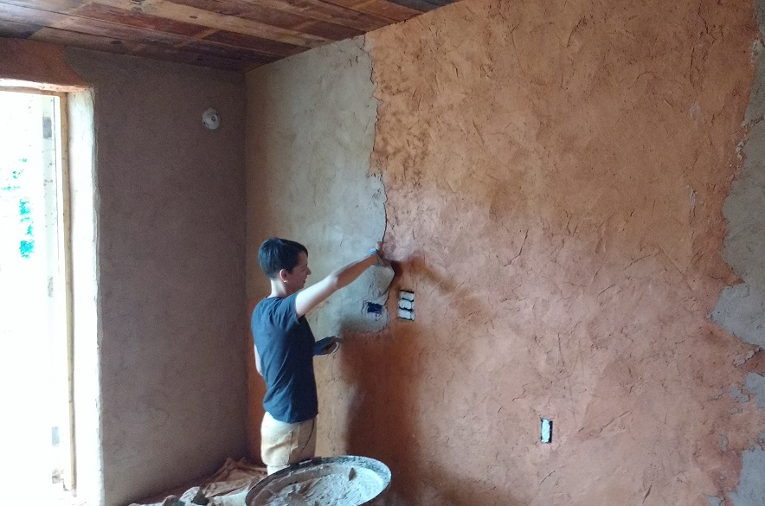
Here I am, applying a second coat just a little too thin. The corner above my head is the same corner from the first picture in this post, before the paint, fixtures and decorations.
The good news is lime plaster is very easy to patch. You just slap some on wherever it’s needed whenever you’ve got a batch made. No sanding or feathering-in necessary, because once you hit it with a coat of paint, it’s invisible in the infinitely varying texture of the wall. I love those textures. Nobody else can tell the difference, but I can see where it was my trowel and where it was DF’s that laid the frosting on, like knowing every freckle on a beloved child’s face.
The negatives are the typical ones with natural building. It tooook foreeeeever (but nowhere near as long as cob would have). It was messy, and the results more variable than with engineered materials. Probably the biggest drawback is that while straw dust is harmless to most people, a small number of people have an allergic reaction called farmer’s lung. DF turns out to be one of those people, which is the main reason we won’t be doing straw on the next project.
But on the plus side, lime plaster and straw clay can both get wet without disaster, as they did when I accidentally put a screw through a PEX pipe feeding the shower, or when I messed up the tub installation and didn’t get around to fixing it for a couple of months. Straw and plaster don’t fail like drywall even if they get soaked, as long as they don’t stay wet long enough to mold. The plaster and clay wick the moisture out of the straw, speeding the drying. Though there may be a little surface staining, it’s easily fixed with a coat of paint.
I’m very pleased with how the straw clay and plaster walls perform overall. The interior walls seem to have good sound-insulation properties compared to drywall, which matters in a little house with little people. They insulate as well as they were meant to. They look beautiful where they haven’t been skull-bashed, and they were mostly locally-sourced and inexpensive. The exterior plaster keeps the moisture out, which is what you want from a house.
Have you taken up the challenge of building on your own? What mishaps or successes did you experience? Share in the comments.