So this is a handout I just put together for a few grafting workshops I will be teaching in the upcoming weeks! I am pretty excited to be sharing some awesome homesteading skills with people who want to learn how to graft trees! If any of you want to use this handout in a workshop you are a part of or know somebody who might be interested in this, please share far and wide, and feel free to leave comments and thoughts below. Peace & Cheers
Why We Graft
 Fruit tree cultivation has been a part of human history for thousands of years. Since before records, farmers and gardeners across the globe have traditionally incorporated fruit trees into their landscapes.
Occasionally some of these fruit trees have displayed characteristics or flavors that were sought after or defined the benchmarks of what makes a great fruit. These trees, the ones that were prized for their unique and delicious fruit were propagated through grafting, which is a way of vegetatively cloning a specific variety of fruit tree. Any grafted fruit variety will be genetically identical to the plant it was taken from.
By taking a cutting of the fruit variety that is intended to be grafted, and properly attaching it to another tree or rootstock that is genetically compatible, you in essence can build a new tree to suit your needs – whether that be for flavor, preserve old genetics, trial new varieties, or for climatic factors that are suited to your growing spot.
Tree grafting dates back to at least ancient China and was used throughout the Roman empire. Early use of grafting was most likely inspired by nature. Occasionally trees in nature will graft themselves together when twisted and overlapping branches grow together. When humans figured out that they could do something similar, it allowed them to become orchardist with many trees of the same variety. This allowed for the cultivation of uniform fruit trees, and making harvest easier and more efficient
Types of Grafts
There are many types of grafts that can be used when creating or updating trees. The most common type of grafting is bench grafting which is done in late winter or early spring. This requires a piece of rootstock, scion wood, and grafting supplies. Bench grafts can be done inside at a kitchen table or a workbench, and they are the easiest way to make new trees with named fruit cultivars.
Another type of grafting that you may find yourself doing someday is called top working or frame working an already existing tree. This allows you to grow many varieties of fruit on one tree, or completely change what variety a tree is growing over to a new one. Luther Burbank, the famed plant breeder from California, had a plum tree with over 300 varieties on it, so top working a tree can be a lot of fun!
As a beginning grafter, there are only two grafts that you really need to know about, the cleft graft and the whip and tongue graft, both of which can be used in bench grafting or top working a tree. The cleft graft is the easiest of the two to perform, but the whip and tongue when performed properly can give you a stronger graft union, and ultimately a stronger tree.
Which ever grafting technique you are using, the most important thing you need to do is to properly line up the cambium layers on the scion wood and the rootstock (or branch that you are top working). The cambium layer is the inner layer of bark that produces the growth rings inside the tree, adding new layers of phloem and xylem each season. The better the cambium layers match up, the more likely the graft will properly heal leading to many years of fruit production.
 The cleft graft is a great place to start grafting due to its simplicity. All it requires is a centered, vertical slice down the rootstock (creating a cleft), and making two identical cuts on either side of the scion wood basically turning it into a slim wedge. The scion is then inserted and slid down into the cleft of the stock, all the while keeping the cambium layers lined up. The cleft graft allows you to use smaller scion wood with a bigger diameter stock. Once you are happy with the alignment of the cambium layers, wrap your graft with grafting tape or a binder, and then coat with wax or parafilm to help prevent desiccation.
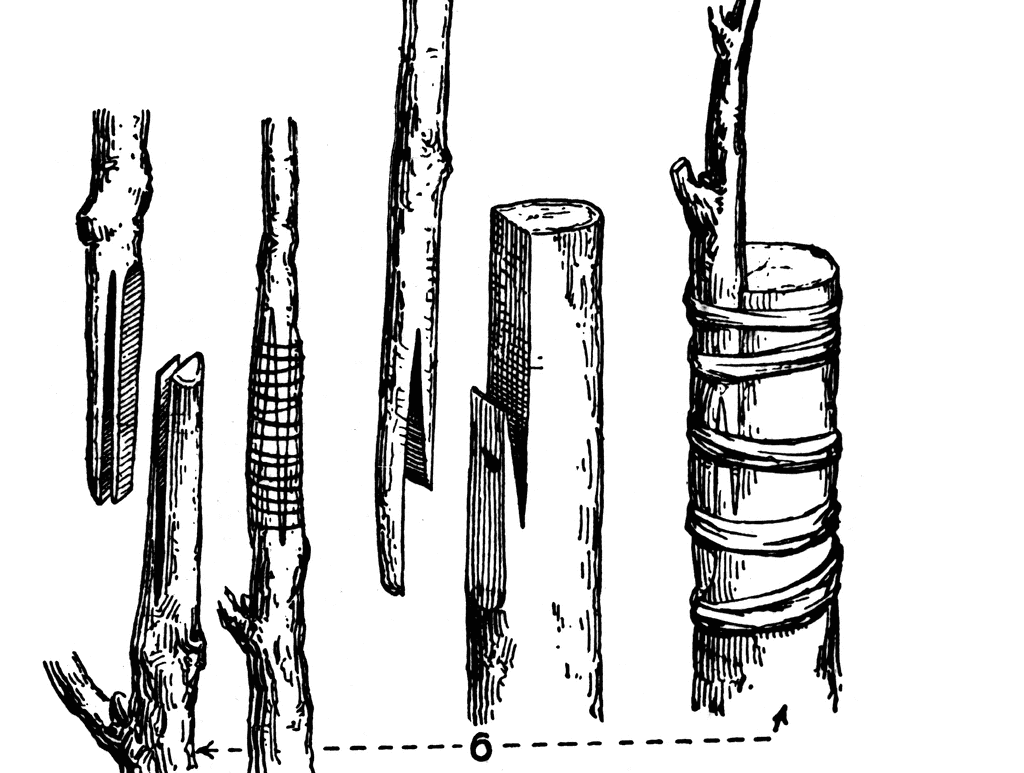 The whip and tongue graft is a bit more difficult than the the cleft graft, but with a bit of practice becomes quite easy. The whip and tongue is prefered when the scion wood and your grafting stock are of almost similar diameters. It allows you to maximize cambium layer contact, and makes for a stronger graft union. Both the scion wood and the stock get a long diagonal cut that when put together, line up and form a new single branch or tree. The secret to a good whip and tongue graft is the second cut you do on each piece which creates the “tongue”. This tongue allows the two pieces to lock together, and because of the natural elasticity of the wood, this does a great job in helping the graft union to heal very strongly.
Both the cleft graft and the whip and tongue are great grafting techniques and with practice you can attain close to 100% success with either one. Regardless of which one you choose to use, lining up the cambium layers is the most important part of successful grafting. Always remember to wrap your grafts tight using either a rubber band or grafting tape, and then finish them with parafilm or grafting wax. Coating the graft union and the scion wood with grafting wax or parafilm will keep the wood from drying out.
Materials
- Rootstock – Rootstock comes in in many different types. Usually they are selected for their dwarfing traits, their resistance to certain blights, or their abilities for growing in certain conditions. Just remember, use apple for apple, pear for pear, etc..
- Scionwood – Scion wood can be collected from neighborhood trees, local orchards, or be obtained through trading networks like the North American Scion Exchange. Store them in a plastic bag, with a lightly damp moist towel and they can keep for up to a few months.
- Grafting Knife – You can purchase any number of grafting knives through amazon or other websites. They can also be made out of old steak knives or you can just use a razor knife.
- Grafting Tape or Rubber Bands – You will want to use one of these to help tie the graft together. Both are fairly easy to use and find. Some people also use old plastic bags cut into strips. Experiment away!
- Grafting Wax or Parafilm – You can purchase grafting wax online, or you can also use the wax ring that is meant for toilet installs. Parafilm is relatively cheap, can be purchased online, and is superior to wax – super easy to use and no clean up!
- Labels – Labeling your grafts/trees immediately is very important. You may think you have a great memory, but eventually you will forget. You can use plastic tags and a sharpie marker or even better is aluminium tags that are completely weather proof.
- Band Aids – Grafting is a lot of fun, but remember, you are using a sharp knife, be careful, take your time, and try not to cut yourself! Oh yeah, have fun too!
Resources
- A History of Tree Grafting – https://www.hort.purdue.edu/newcrop/janick-papers/c09.pdf
- Reproducing Fruit Trees Through Graftage –http://www2.ca.uky.edu/agc/pubs/ho/ho39/ho39.pdf
- Steven Hayes Yout Tube – https://www.youtube.com/channel/UC4nsuKboTJBTPVnNXmMfpJA
- Dan Bussey, Seed Savers – https://www.youtube.com/watch?v=37KdQHL9koo
Books
- The Apple Grower – Michael Phillips
- The Holistic Orchard – Michael Phillips
- The Grafter’s Handbook – RJ Garner